During 2018 a lot of users had problems with goals in Google Analytics. 95% of those case were connected with 2 things:
- After the release of the version 5+ of Contact Form 7 the old way of creating goals (on_sent_ok) didn’t work and the developers suggested using DOM-events.
- Since the end of 2017 all the new accounts on Google Analytics were suggested to set a new tracking code: Global Site Tag, or gtag.js.
This article is going to tell you, how to create and edit goals in Contact Form 7 in 2020, so that they work. We use the real web-site Mebelzakaz5.by as the example. At the end of the article you can find the information on how to check the efficiency of your goals.
DOM-events of Contact Form 7 – what and for what is it
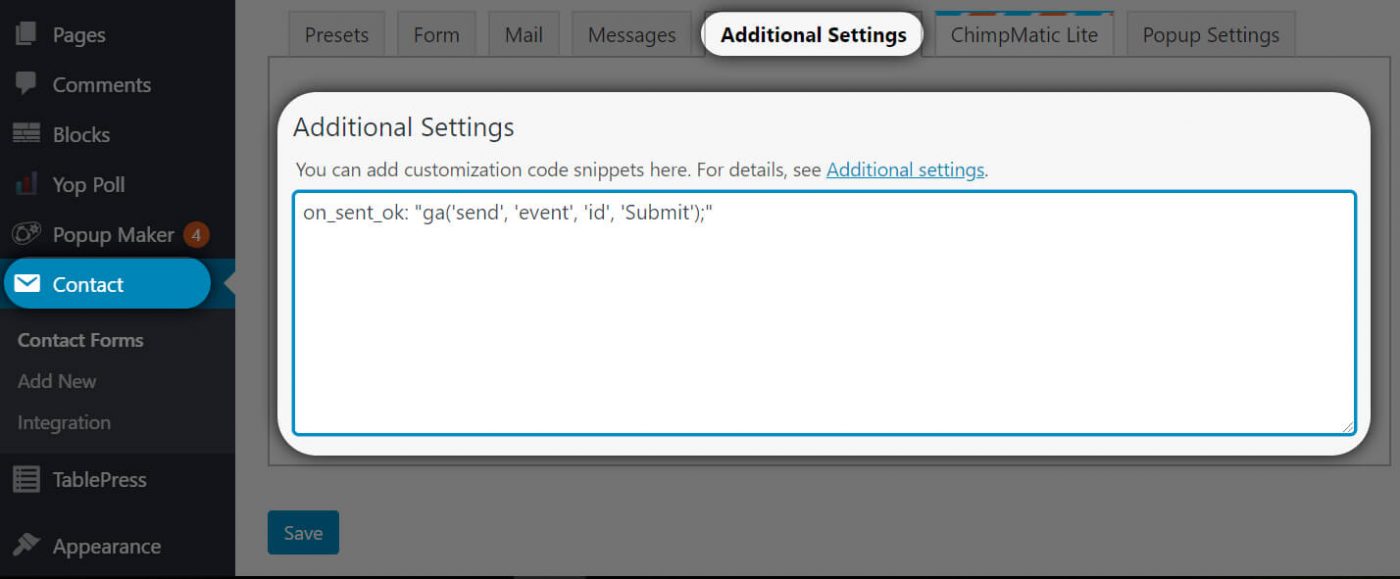
Till the version 5 of Contact Form 7 we used to use on_submit or on_sent_ok settings to track the goal. And used to type it in the “Additional Settings” tab:
|
1 |
on_sent_ok: "ga('send', 'event', 'id', 'Submit');" |
But since the 5.0 version of CF7 those settings were replaced by DOM-events. The developers explained that by the security threat, which can be caused by on_submit or on_sent_ok settings, moreover, they were outdated.
Here are some available DOM-events:
wpcf7invalid – works, when some fields are filled in incorrectly, the form is not sent;
wpcf7spam – works, when spam is suspected, the form is not sent;
wpcf7mailsent – works, when the form is filled in successfully and the email is sent;
wpcf7mailfailed – works, when the form is filled in successfully, but the email is not sent because of some error;
wpcf7submit – works, when the form is successfully sent, regardless of the other accidents
Today we’re going to use wpcf7mailsent, which works when the form is sent.
How to create goals in Google Analytics for Contact Form 7
It’s not so easy, because of the confusion between the old and the new tracking code.
The old tracking code of GA – analytics.js (until 2018):
|
1 2 3 4 5 6 7 8 9 |
<!-- Google Analytics --> <script>(function(i,s,o,g,r,a,m){i['GoogleAnalyticsObject']=r; i[r]=i[r]||function(){(i[r].q=i[r].q||[]).push(arguments)},i[r].l=1*new Date(); a=s.createElement(o),m=s.getElementsByTagName(o)[0]; a.async=1;a.src=g;m.parentNode.insertBefore(a,m)})(window,document,'script','//www.google-analytics.com/analytics.js','ga'); ga('create', 'UA-XXXXX-Y', 'auto'); ga('send', 'pageview'); </script> <!-- End Google Analytics --> |
The new tracking code of GA – gtag.js (since 2018):
|
1 2 3 4 5 6 |
<!-- Global site tag (gtag.js) - Google Analytics --> <script async src="https://www.googletagmanager.com/gtag/js?id=UA-XXXXXXXX-Y"></script> <script>window.dataLayer = window.dataLayer || []; function gtag(){dataLayer.push(arguments);} gtag('js', new Date()); gtag('config', 'UA-XXXXXXXX-Y');</script> |
It must be admitted, that both the new and the old codes work fine and transmit data to Analytics. So if your site has the old code, don’t worry. But if you want to learn the difference, read it below.
The only aim of the new counter is to have a centralized tag , which transmit data to all the marketing and analytical Google tools.
How to edit goals in Google Analytics
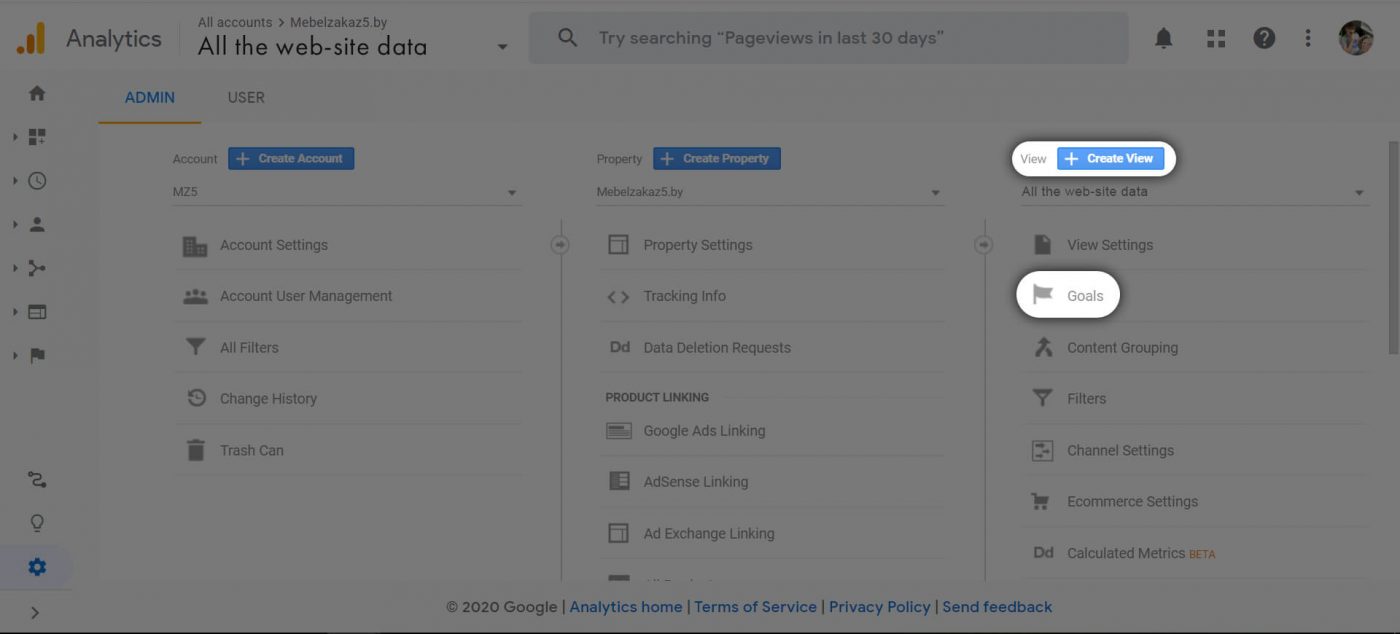
1. Choose the site, go to Admin

2. Find the View tab and choose Goals
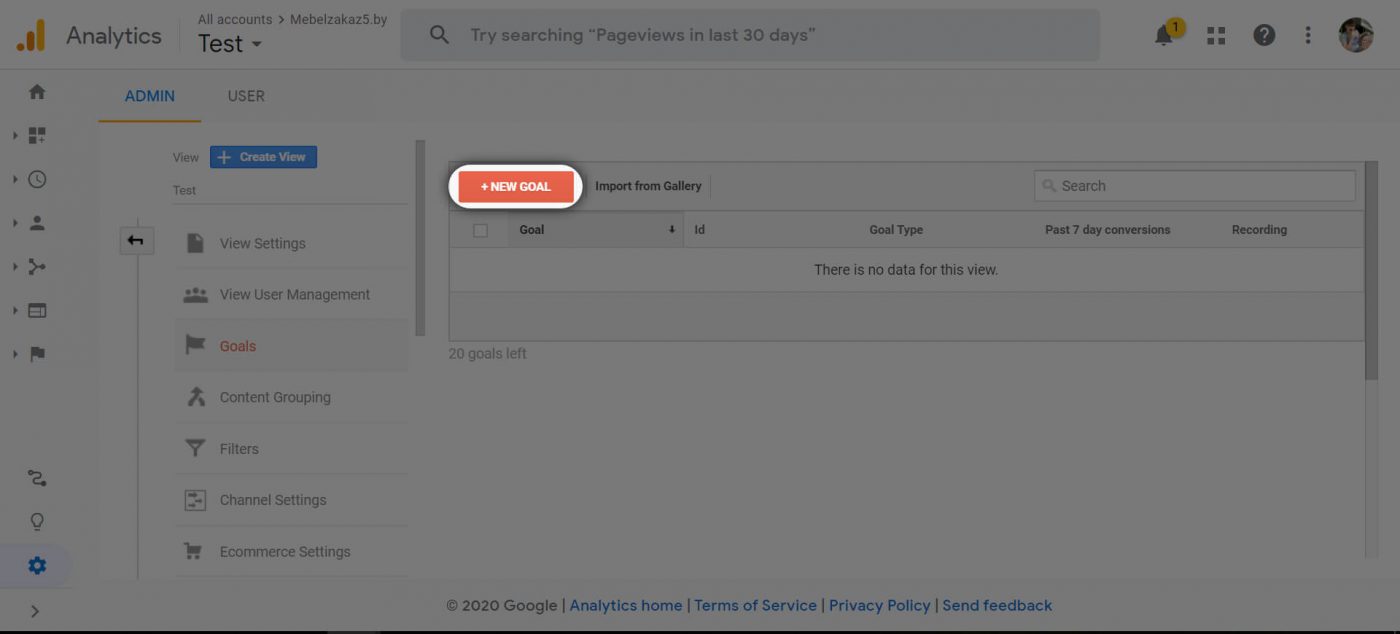
3. Click on +New Goal
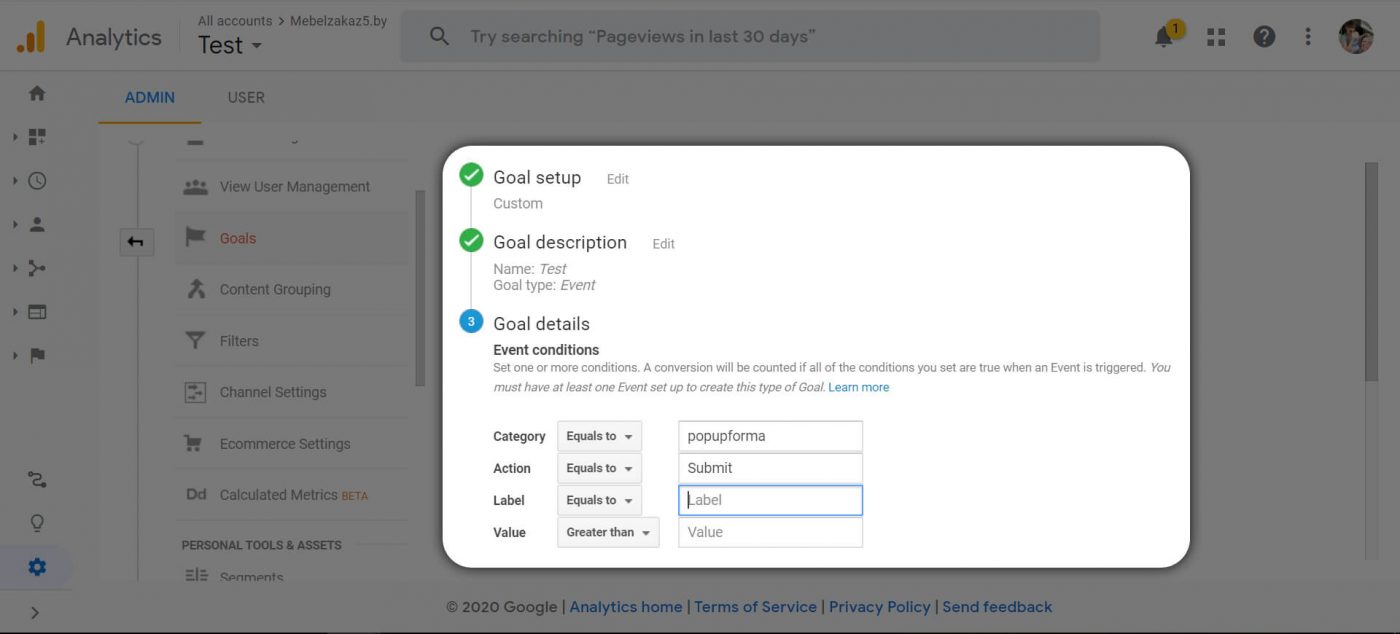
4. a) In Goal setup you choose Custom;
b) In Goal description you type the name of the goal and choose Event as the type of it;
c) In Goal details you type unique ID in Category, then you type “Submit” in Action;
d) In Use the Event value as the Goal Value for the conversion choose Yes
Setting the tracking of the goal on WordPress
Before you edit the goals, you need to know which tracking code your site has. The easiest way to do it is to press “Ctrl+U” and find the counter code.
If you’ve got the old counter, your tracking code is the following:
|
1 2 3 4 5 |
<script type="text/javascript"> document.addEventListener('wpcf7mailsent', function(event) { ga('send', 'event', 'formapopup', 'Submit'); }, false); </script> |
If you’ve got the new counter, your tracking code is the following:
|
1 2 3 4 5 6 7 8 |
<script type="text/javascript"> document.addEventListener('wpcf7mailsent', function(event) { gtag('event', 'send', { 'event_category': 'formapopup', 'event_action': 'Submit' }); }, false); </script> |
Instead of “formapopup” you type your ID, which you pointed in the Category field. “Submit” – is what you typed in the Action field.
How to create goals in definite or several forms of Contact Form 7
The paragraphs above told you about the tracking method that works when any CF7 form is sent on your site. Now you’re going to learn how to set the tracking of the definite form being sent.
The developers suggest using event.detail.contactFormId feature. There are other methods, but this one is the easiest.
In order to make such a form, you need to know it’s ID. Go to Contact form 7 and in column Shortcodes you can see its ID.
Click on the image to enlarge it

So you’ ve got the ID of your form. Now you substitute your ID instead of mine (1753) in this code:
|
1 2 3 4 5 6 7 8 9 10 |
<script type="text/javascript"> document.addEventListener('wpcf7mailsent', function sendMail(event) { if ('1753' == event.detail.contactFormId) { gtag('event', 'send', { 'event_category': 'formapopup', 'event_action': 'Submit' }); } }, false); </script> |
Now the information about the sending of the form is conveyed to Google Analytics.
As you’ve already guessed, you need to paste this code to the Footer or the Header of your site. In the line ‘event_category’ instead of ‘formapopup’ you type the category that you selected when you setted the goal details on Google Analytics.
Example of a tracking code for goals from several forms:
|
1 2 3 4 5 6 7 8 9 10 11 12 13 14 15 16 17 18 19 20 21 22 |
<script type="text/javascript"> document.addEventListener('wpcf7mailsent', function sendMail(event) { if ('1753' == event.detail.contactFormId) { gtag('event', 'send', { 'event_category': 'formapopup', 'event_action': 'Submit' }); } if ('1754' == event.detail.contactFormId) { gtag('event', 'send', { 'event_category': 'zakaz', 'event_action': 'Submit' }); } if ('1755' == event.detail.contactFormId) { gtag('event', 'send', { 'event_category': 'zayva', 'event_action': 'Submit' }); } }, false); </script> |
How to check whether goals work in Google Analytics
There are several methods, so let’s consider them:
1. Universal method
Add to the code of the goal the following:
|
1 |
console.log('works'); |
Instead of “works” you can type anything you want.
As the result, it looks like this:
|
1 2 3 4 5 6 7 8 9 10 11 |
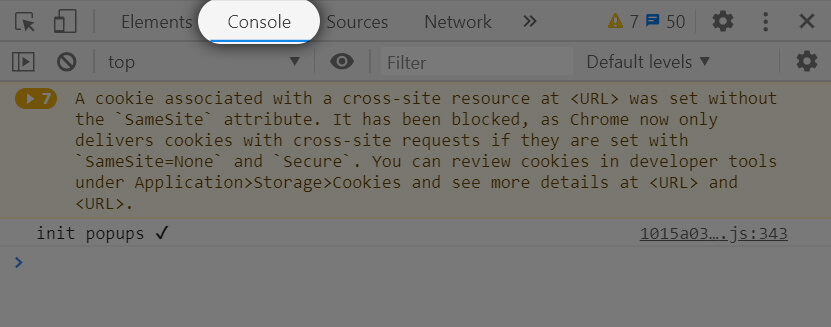
<script type="text/javascript"> document.addEventListener('wpcf7mailsent', function sendMail(event) { if ('1753' == event.detail.contactFormId) { gtag('event', 'send', { 'event_category': 'formapopup', 'event_action': 'Submit' }); console.log('works'); } }, false); </script> |
Go to the site and send the form. Bring up the console with the shortcut Ctrl+Shift+I (for Chrome and Opera) or click on the right mouse button and choose Inspect. Then go to the Console tab and check if the goal worked.
Click on the image to enlarge it
2. Fast check
Go to Google Analytics site, find Realtime, then Events. There you can see all the events, that happened during the last 30 minutes.
Click on the image to enlarge it

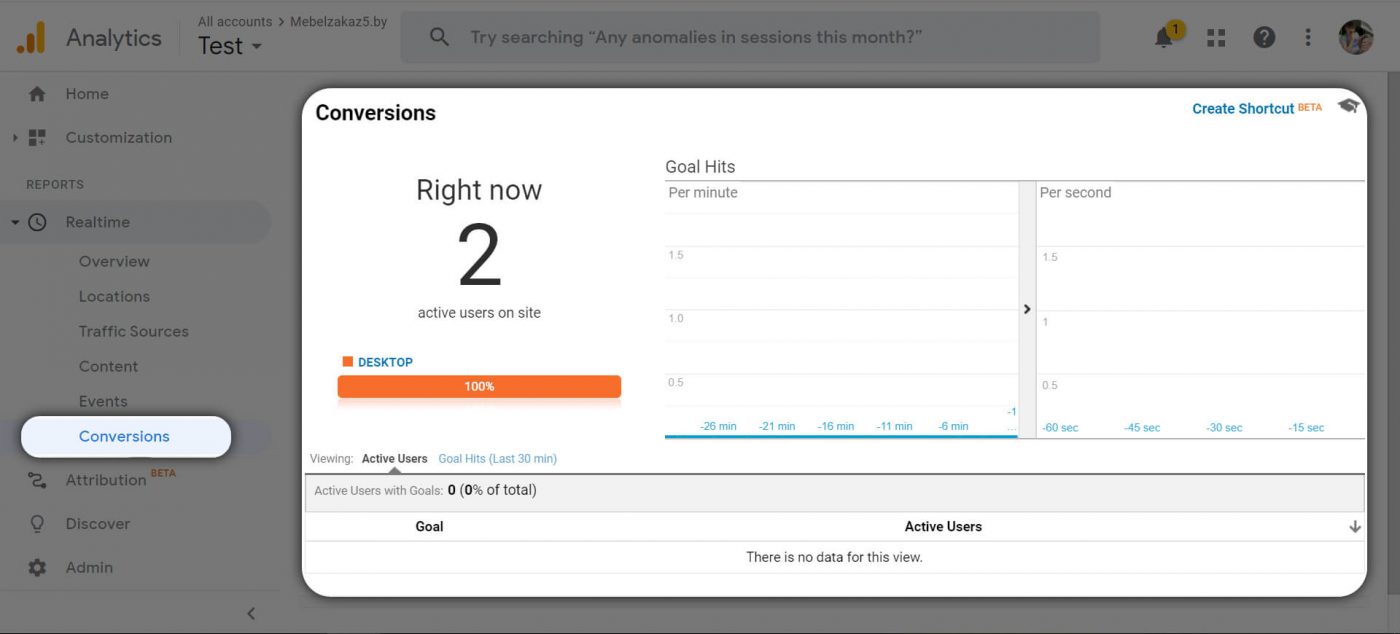
In Conversions tab you can see the goals that were achieved during the last 30 minutes.
Click on the image to enlarge it
That’s all! Now you know enough to create and edit goals for Contact form 7 in 2020. Any questions? Ask them in the comments!
Have you not understood? We can help you! Read the information below.
We set up to 10 goals for just $10 for you
For $10 only we can cet 10 goals for any events (not only CF7) on a wordpress site.
Write us on agencyagvento@gmail.com, on Telegram or leave a request below:
Very useful article, I don’t like to use plugins to implement this function. The more plugins, the more delay the website will be. Thank you!
First time I planed to install plugin. But after this tutorial, I implement Goal feature manually. Though took some time to get the results. Here is my website (fotomasking.com) and added it onto the contact form submit button/even 🙂
Thank you so much.
Where am I suposed to put the javascript code ?
document.addEventListener(‘wpcf7mailsent’, function sendMail(event) {
if (‘10697’ == event.detail.contactFormId) {
gtag(‘event’, ‘send’, {
‘event_category’: ‘contactsent’,
‘event_action’: ‘Submit’
});
}
if (‘12684’ == event.detail.contactFormId) {
gtag(‘event’, ‘send’, {
‘event_category’: ‘newslettersent’,
‘event_action’: ‘Submit’
});
}
}
}, false);
If I copy paste this adapted code, I have a message “unexpected identifier”…